Blog Series: Toolbox Talk
- Apr 28, 2025
- 5 min read
Updated: 4 days ago
Episode 1: Must-Have Tools for Every Flooring Job
Welcome to our new 5-part series: Toolbox Talk - your go-to guide for industry-specific tools and trade-tested tips. Whether you're laying floors, installing windows, or managing a cleaning crew, this series is packed with practical advice from professionals in the field who know what works (and what doesn’t).
Over the next five weeks, we’ll explore the essential tools that help crews work smarter, not harder, across a variety of trades:
Ep 1: Must-Have Tools for Every Flooring Job
Ep 2: How Plumbers Organize Their Vans for Maximum Efficiency
Ep 3: Time-Saving Tools for Deck Builders
Ep 4: Power Tools That Changed the Game in Window Installation
Ep 5: Cleaning Tech That Speeds Up Commercial Jobs
If you’re a contractor, technician, or business owner looking to boost productivity, cut waste, and keep your team on track, this series is for you.
Ep 1: Must-Have Tools for Every Flooring Job
Whether you're working on luxury vinyl plank in a condo or installing hardwood in a custom home, having the right tools makes all the difference. The best flooring installers don’t just rely on experience—they rely on a dialed-in toolkit that helps them work clean, fast, and without surprises.
Here’s our breakdown of the must-have tools that should be in every flooring pro’s van:
1. Flooring Cutter / Guillotine Cutter

A flooring cutter, also known as a guillotine cutter, is your first choice for quick, quiet, and clean cuts—particularly for straight edges on vinyl, laminate, or engineered wood. In contrast to power saws, this tool won't kick up dust or make a lot of noise, making it ideal for installations in occupied buildings such as homes, apartments, or offices where disruption is to be kept to a minimum.
These cutters are designed for efficiency and mobility. They enable you to make repetitive cuts at the point of install, minimizing trips to the saw station and keeping your workflow clean.
Pro Tip: Select a model that can accommodate the full width of your most frequently used flooring materials, and consider features such as replaceable blades and extended handles for leverage.
2. Table Saw & Jigsaw

When you encounter intricate cuts—such as notching along a door frame, fitting planks around heating and air conditioning vents, or completing a transition—power saws are the way to go. A table saw is great for ripping down planks or cutting long, straight lines, while a jigsaw provides you with the versatility to cut through irregular shapes and angles.
For installers working on-site with multiple material types, having both saws available ensures you’re ready for precision work at any stage of the job.
Pro Tip: Always use a fine-tooth or laminate-specific blade to reduce chipping and get smoother cuts, especially on high-gloss or printed vinyl surfaces. Clean, professional cuts are a signature of great workmanship.
3. Tapping Block & Pull Bar

Click-lock flooring requires accurate installation so the seams fit tight—but you can't hammer the planks together without compromising the tongue and groove joint. Enter the tapping block and pull bar.
The tapping block allows you to drive planks together tightly without wrecking the tongue and groove joint. The pull bar is applied to tighten up planks against walls and edges where your tapping block or mallet can't go.
Pro Tip: Don't use scrap wood as a homemade tapping block. It splits, ruins the planks, or applies uneven pressure. A tapping block is designed to fit into click systems for safe and uniform pressure.
4. Chalk Line & Measuring Tools
All perfect floors begin with the initial row. A crooked first row will disrupt the entire design, causing gaps, wasted boards, and endless course adjustments. That's why accurate layout tools such as a chalk line, measuring tape, square, and laser level are essential.
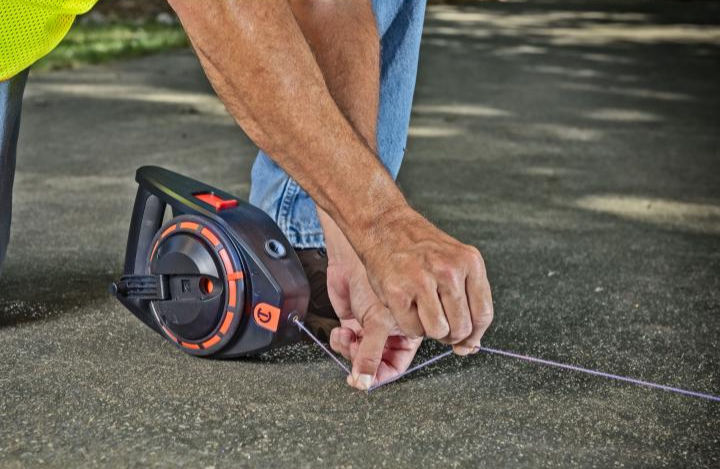
Use a chalk line to snap straight lines and mark your points of reference. A laser level can be particularly useful when dealing with larger or open-plan rooms where long, uniform rows are needed.
Pro Tip: Don't take walls for granted—measure and compensate accordingly to keep visual alignment throughout the room. Always double-check your layout before committing to the first few rows.
5. Non-Marring Mallet

You require force to fit planks together—but not at the cost of damaging them. A non-marring rubber mallet provides you with the strength to force planks together without scuffs, marks, or dents on sensitive surfaces.
particularly effective for fitting the ends of floating floor planks together, this mallet is an all-day companion. Select one with a balanced handle and shock-absorbing grip to minimize fatigue.
Pro Tip: Use white or soft rubber heads on light-colored floors to prevent smudges or black marks.
6. Knee Pads & Flooring Roller

Flooring is hard on your body, particularly your knees. Good knee pads are key to minimizing long-term strain and enabling you to remain comfortable on lengthy installs. Seek out gel or foam-core types that flex with you and don't constantly move around.
If you're installing with glue-downs, a flooring roller is just as vital. It applies even pressure to the surface, enhances bonding, and avoids future bubbling or lifting.
Pro Tip: Store spare knee pads in the van. They're cheap insurance against damage, and replacing sweaty or worn-out pads during a job keeps you working.
7. Shop Vac & Dust Control Tools

Cleanliness is not all about looks—it's also about safety and client satisfaction. A HEPA-filtering shop vac is a key tool for staying one step ahead of dust and debris during and after the installation. Whether you're trimming indoors or preparing subfloors, controlling dust keeps the air clean and the workspace organized.
Dust impacts adhesion for glue-down products, too, so clean subfloors are essential for optimum long-term performance.
Pro Tip: Use attachments to clean corners, edges, and under trim. A professional-looking job site creates instant trust with clients and inspectors as well.
8. Moisture Meter

Moisture is a sneaky killer when dealing with flooring installations. To install over a wet subfloor—particularly concrete—can lead to warping, buckling, or mold problems in the future. A moisture meter allows you to determine if the floor is ready to be installed, keeping your work and warranty safe.
Use a pin-style or pinless meter based on your application, and take readings from several areas across the subfloor prior to starting.
Pro Tip: Take moisture readings before starting the job. It's a good defense if something goes wrong later—keeping a record of your procedure demonstrates professionalism and conscientiousness.
9. Undercut Saw

Doorway or casing transitions tend to make or break the look of a flooring installation. An undercut saw lets you cut door jambs, baseboards, and molding cleanly so new flooring can slide underneath—without the necessity for clunky thresholds or weird angles.
You can use manual models or electric undercut saws with adjustable depth and height. Both of these enable you to produce a customized finish that appears intentional and refined.
Pro Tip: Make test cuts on scrap trim first to have your settings adjusted. Consistency and accuracy are essential to smooth transitions.
10. Adhesive Trowels & Spreaders

When installing glue-down flooring systems, proper size and notching on your trowel will provide you with adequate adhesive coverage without waste or weak areas. Various adhesives require different application patterns—don't think one trowel does it all.
Trowels deteriorate over time, so check them frequently. Worn edges can impact coverage and cause uneven bonding.
Pro Tip: Have distinct trowels marked for urethane, pressure-sensitive, and epoxy adhesives. This avoids cross-contamination and makes you work more efficiently.
Wrap-Up: Smart, Work Smart
The equipment you bring is an extension of your skill. From preparing the subfloor to installing the last plank, each of these tools is a contributor to enabling you to work cleaner, faster, and with less error. Periodically checking and enhancing your toolkit isn't good practice—it's a strategic choice that keeps your crew professional, efficient, and one step ahead.
Stay tuned for Episode 2: How Plumbers Organize Their Vans for Maximum Efficiency, where we’ll dig into real-world setups that cut down on time and stress.


Comments